In our this guide we are going to cover an awesome information gathering tool called Amass originally created by Jeff Foley, later it adopted by OWASP and Jeff is Amass project leader now.
Amass is a command line open-source tool that helps information security professionals to perform network mapping of attack surfaces and perform external asset discovery using open source information gathering and active reconnaissance techniques.
In order to do this, Amass heavily focuses on DNS, HTTP and SSL/TLS data discovering and collecting. Amass uses its own internal mechanism and it also integrates perfectly with some external services (SecurityTrails, AlienVault, Shodan etc) to increase the efficiency and power of it's results.
In our detailed guide we are going to learn how to install & use Amass on Kali Linux. So without wasting any more time lets get started.
How to Install Amass on Kali Linux
If we are using an updated version of Kali Linux large, then we don't need to install Amass on our system, it comes pre-installed. But if Amass doesn't present on our Kali Linux system then we can easily install it by simply using following command:
How to use Amass on Kali Linux
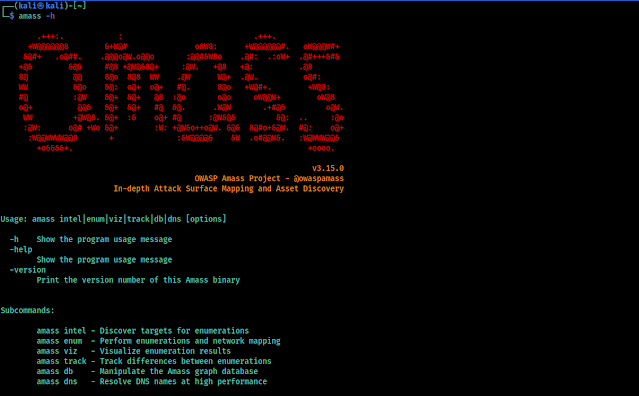
Before starting using any tool we should check it's help options. We are also doing the same for Amass also. To check it's help we run following command on our terminal window:
In the following screenshot we can see the output of our applied command:
In the above help menu we can see that Amass have some options. Let's have a look on to them:
- intel: Collect intelligence on the target in order to determine our starting point.
- evum: Perform enumeration & mapping of our target to determine possible attacks.
- viz: Show the results on a visual formats with analysis and future research.
- track: Compare results across enumerations to see changes in their attack surface.
- db: Manage the graph databases storing the enumeration results.
- dns: Resolve DNS names at high performance.
Getting Subdomains using Amass Enum
Enough talking about Amass. Let's use it. The most basic use of it is "subdomain enumeration". We can do it by applying following command:
Here we have used -d flag to specify our target domain. In the following screenshot we can see the output of our applied command:
That is the basic subdomain discovery. We can get better results using following command:
Getting Information using Intel
We can do a lot of tings with Amass. For an example we are looking for an organization using "google" in their name. We can use following command to do this:
After applying the above command we need to give couple of minutes to find it. We can see it on the following screenshot:
We can also reverse whois data. By this way we can grab the details from the specified domain’s whois records, and then tries to find other domains with the similar whois records. That way we can know about a website owner have other websites. We can use following command to do this:
The output shows in the following screenshot:
These all domains have similar whois information as Google.com, so there is high chance that Google owns them.SSL Certificate Grabbing
If we know IP addresses and feed it to Amass using -active flag, Amass will pull the SSL certificate from every IP address within the IP range and then spits back the domain that the SSL cert is associated with. For an example we use the following command:
In the following screenshot we can see that it is running on a well known Paypal-owned CIDR range.
Tracking using Amass
Our every scan done with amass is automatically stored on our system that we ran it on. Then, if we run the same scan again, amass will track any changes that have taken place since your last scan. The most perfect way to use this feature is to discover which new subdomains have appeared since our last scan. For example, We had scanned oswap.org on the morning, so I ran the following command to track that.
In the following screenshot we can see there are no changes. If we got some new subdomains that means that might be vulnerable.
Visualization on Amass
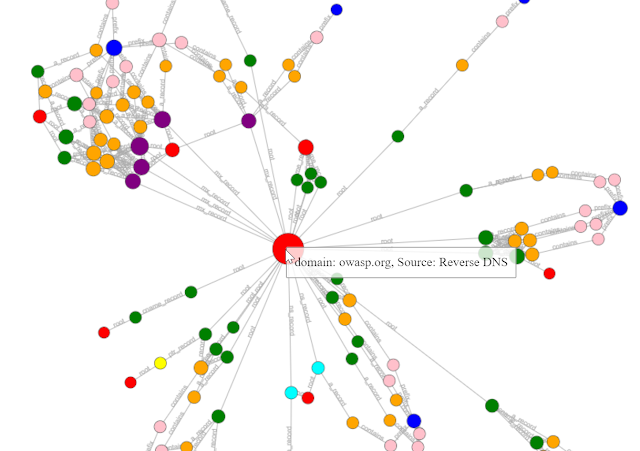
Frankly speaking we are not fan of this. During the information gathering we love to see the results on a text based format, but visualization on Amass looks really cool. We need to use viz for that, as we did in the following screenshot:
This viz subcommand on Amass allow us to visualize all the gathered information of target (stored in the Amass graph database) for a target in a number of ways. Results can also be imported into Maltego for more OSINT analysis.Amass Database
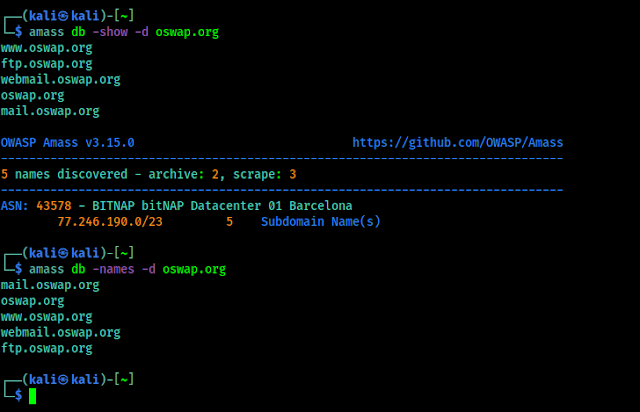
Amass Database (db) is a Amass subcommand that is useful to view the recon data for every scan that we had ever done.
To list all of the details of all of our previous scans, we need to simply run command like amass db show, If we want to see details of a specific domain, then we just need to add the -d flag like following,
If we prefer a nice clean, plain output, we can output the discovered domains or subdomains using the -names flag instead of -show. The outputs are shown in the following screenshot:
In the above screenshot we just have the subdomains, because we did not gather more information on oswap.org, but if we have it will show us.
Amass Scripting Engine
Like Nmap scripting engine Amass also have scripting engine which can be used to add our own data sources on Amass. Like we have an updated API which Amass doesn't integrated yet, so we don't need to wait for Amass adds it. We can add it on Amass and use it. For more details we can check this manual.
For more detailed guide we can suggest some awesome sources to learn more about Amass:
Amass is really a great tool for information gathering and recon works. In this article we saw that how we can use Amass on our Kali Linux system.
Love our articles? Make sure to follow us on Twitter and GitHub, we post article updates there. To join our KaliLinuxIn family, join our Telegram Group. We are trying to build a community for Linux and Cybersecurity. For anything we always happy to help everyone on the comment section. As we know our comment section is always open to everyone. We read each and every comment and we always reply.


