Fern WiFi cracker, The name says about it. It's a GUI based WiFi security auditing tool that written on Python. Fern WiFi cracker can crack and recover WEP/WPA/WPS keys and also run other network based attacks on wireless or Ethernet based networks. Fern created by Saviour Emmanuel Ekiko.
In today's tutorial we learn how we can run security auditing on a WiFi network from our Kali Linux system using Fern WiFi cracker tool.
Key-Features of Fern WiFi Cracker:
- WEP Cracking with Fragmentation,Chop-Chop, Caffe-Latte, Hirte, ARP Request Replay or WPS attack.
- WPA/WPA2 Cracking with Dictionary or WPS based attacks.
- Automatic saving of key in database on successful crack.
- Automatic Access Point Attack System.
- Session Hijacking (Passive and Ethernet Modes).
- Access Point MAC Address Geo Location Tracking.
- Internal MITM Engine.
- Bruteforce Attacks (HTTP,HTTPS,TELNET,FTP).
- Update support.
Using Fern in Kali Linux
Fern WiFi cracker comes pre-installed with Kali Linux latest full version. We can run it from the Kali Linux application menu Wireless Attacks > fern wifi cracker.
 |
| Kali application menu |
Or we can run following command on our terminal to open Fern.
It will ask us the sudo password to run because fern needs superuser access to do it's work. After providing it will run and we got it's main menu like following screenshot:
Every time we open fern it will check for update and if we have a updated version of Kali then it will ask us to use it's professional version. It is available for purchase in http://www.fern-pro.com. We are not going to buy it so we choose "No" and the main menu of Fern opens like the following screenshot:
Here we need to choose the network interface. Here one thing, to play with WiFi security we must need a special external WiFi adapter that supports monitor mode and packet injection.
Now we select the network interface. Usually our devices internal WiFi is the wlan0 interface and to use monitor modes from our external WiFi adapter we need to select wlan1 interface, as we did in the following screenshot:
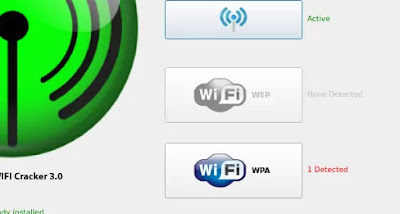
Now we need to click on the "Scan for Access Point" button then it will scan for nearby WiFi networks (WEP and WAP type of wireless protocols).
Here in our following screenshot we can see that we found a single WiFi network (because we are testing this on a remote area in our own system). On the cities we can found lots of WiFi networks.
In the above screenshot we click on the on the 1 detected WiFi WPA button and we got the attack interface as following screenshot:
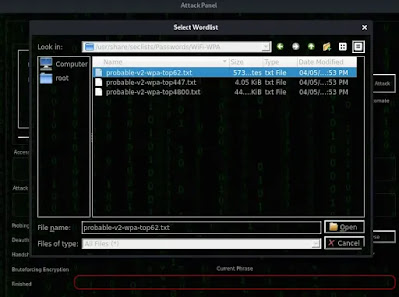
Now here we need to choose options to perform attack. We choose the attack type to "Regular attack". Then we choose the dictionary file to crack the WiFi password.
Here we need a dictionary file. A dictionary file/wordlist is a text file that contains lots of passwords. Our attack will follow the brute-force method first it capture the handshake file from the WiFi network then it try to crack the handshake file by brute-force method from our given password file. We will discuss about how it works later.
A bigger dictionary file or wordlist file provides us higher success rate but it may consume time. We can find a good dictionary file or wordlist file from the internet.
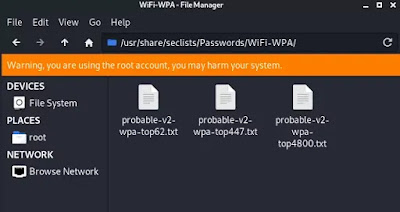
Our Kali Linux comes with some WiFi password lists. We can find them on /usr/share/seclists/Passwords/WiFi-WPA/ location on our system.
 |
| Passwordlist in Kali Linux |
For our this example tutorial we are going to use one of these password lists.
So in the attack pane we choose one wordlist from this directory and click on open to select it.
Now we just need to click on the attack button. Rest everything will be done automatically.
After some time we got our targeted networks WiFi password.
Yes, we did it. We can see the password in red bold line on above screenshot.
Sometime after using this tool our network manager might down. To solve this we can do a restart or use following command:
The above command might not work in VMware installation Kali Linux. If we are using a Virtual install then we should follow this method.
How Does it Work?
Here we discuss on the basics without diving deeper technological terms. We know that when we connect our device to a new protected WiFI we need the password. But from the second time we don't need the the password, Why? Because the password stored in our device for that WiFi network. It stores the hash value of password (not the plain text).
When we try to connect for second time the device sends the password in hash format to the WiFi router and asks to connect (handshake). The router checks everything is correct and allow it to connect.
This tool sends de-authentication packets to the router using our special WiFi adapter.(That's why we need a WiFi router that supports packet injection). For the de-authentication packets all the connected devices with the router got disconnected and as we know after this those disconnected devices again try to connect with the target router.
Whenever the devices try to connect with the router our fern tool will catch the handshake file with the password hashes.
Now these passwords are encrypted and we need a list of password and our tool with match this hash one by one from our given passwordlist (wordlist or dictionary file). This is brute-force attack. If the password will be in our list then we can get it easily. Bigger size of wordlists can increase provide us higher success rate. Come on almost everyone uses common passwords, because these kind of passwords are easy to remember.
When we click on the "Attack" button it starts sending de-authentication packets to the Wi-Fi network. Then "Fern WiFi cracker" starts to crack the password from our given wordlist.
The total process requires at least one active WiFi user on the network otherwise we don't get the handshake file.
Fern WiFi cracker spoofs our Mac address so attacker's devices original identity will be hidden. To know more about Mac spoofing read our this article.
Disclaimer: This tutorial is for educational propose. Attacking others
devices considered as criminal offense. We don't support that. This is for
spreading awareness that we should choose a very strong password for us.
We have used this against our own network.
Love our articles? Make sure to follow us on Twitter and GitHub, we post article updates there. To join our KaliLinuxIn family, join our Telegram Group. We are trying to build a community for Linux and Cybersecurity. For anything we always happy to help everyone on the comment section. As we know our comment section is always open to everyone. We read each and every comment and we always reply.


