Modlishka — Advanced Phishing | Bypass Two Factor Authentication

Modlishka — Advanced Phishing | Bypass Two Factor Authentication

We all try to secure our all online accounts and social media accounts and we turn on the Two-Factor Authentication or Two-Step Verification. Then we think that we are now safe. Sometimes we check a phishing page with wrong password. But Modlishka can bypass Two-factor authentication (2FA).

What is Modlishka?

Modlishka, a reverse proxy automated advanced phishing tool which is written in Go language.It is called the most powerful and ferocious phishing tool ever created. This tool can perform advance level of phishing. Modlishka can easily bypass two factor authentication running on Gmail, YahooMail, RadiffMail, Facebook etc and catch the credentials like username, password, two factor authentication token.

The best thing of Modlishka is this tool doesn’t require any saved phishing page or templates to perform phishing. It uses reverse proxy to open the website live.

How Modlishka Works?

Modlishka works on both social engineering and MITM (Man-In-The-Middle) attack technique. Modlishka server stays between the target website and victim and act like a proxy for victim. The requests are sending from victim and target website passes through Modlishka server. Just like the following picture:

That’s why Modlishka can easily grab the username and passwords given by user and the authentication token it also can capture the sessions and cookies between user and website. Attacker can also use them to make web session.
In this process user will not even realize for a moment that the account was stolen. That’s why Modlishka is a very dangerous tool.

Modlishka is very easy to set up that makes this tool more dangerous. To be safe from this tool we need to check the link we are clicking very carefully, and it will use third party SSL certificate, supose some one send a phishing link of Gmail using Modlishka then this phishing site will not have Google’s SSL certificate.
Be aware and try to not click in any links.

How to Set up Modlishka in Kali Linux

This tool is written in Golang. We need to install Golang in our Kali Linux system. Apply the following command in terminal.

apt-get install golang

 The screenshot is following:

After installing Golang we need to set our GOPATH, this is just like we set path for Java. We will do this using following command:

export GOPATH=$HOME/go

The screenshot is following

Let we check that our path ‘go’ is set in the root directory or not, to check this we type following command:

echo $GOPATH

The screenshot is below:

We can see in the screenshot that or go directory is under the root directory. Yes it’s perfect.

After setting the path we need to download Modlishka from Github to do this we are going to use following command:

go get -u github.com/drk1wi/Modlishka

Remember that we didn’t use https or www before the github link and this command will not show how much percentage we downloaded it will download total tool, we need to wait some time here the screenshot is following:

Then we need to go to the downloaded folder by using the command:

cd root/go/src/github.com/drk1wi/Modlishka

The output of the command is below

Now we can compile Modlishka but before compile this we generate the SSL certificate , here we configure in local host but we also can use our registered domain (Homograph will better ) and SSL certificate here.

First of all we generate a RSA private key by applying following command:

openssl genrsa -out MyCA.key 2048

We can use any name of the key file.

Here is the screenshot of the command:

In the next we are going to generate SSL certificate. The command is following:

openssl req -x509 -new -nodes -key MyCA.key -sha256 -days 1024 -out MyCA.pem

The screenshot is following.

In the information field section we can use any fake information. Feel this looks like target domains SSL information.

Now we can check our SSL certificate and key using ls command:

ls

The following screenshot shows us the key file(MyCA.key) and the certificate(MyCA.pem):

Now we open the key file in leafpad using following command:

leafpad MyCA.key

And copy the whole text then close it, we use Ctrl+A to select all and Ctrl+C to copy the whole thing.

After copy the key we need to paste it in autocert.go file in plugin directory
open this with leafpad text editor applying following command:

leafpad plugin/autocert.go

Paste the key in in the place of the PASTE_YOUR_CA_CERT_KEY_HERE. We will remember that our key will inside of  ‘  ‘. See following screenshot:

Save and close it and then we will copy and paste our SSL certificate. Use following command to copy the certificate.

leafpad MyCA.pem

The screenshot is following:

We will copy the whole thing and paste in the autocert.go file. Let’s again open the file in leafpad text editor by using following command:

leafpad plugin/autocert.go

Then paste it in the place of PASTE_YOUR_CA_CERT_HERE . The screenshot is following:

Save and close autocert.go file.

Yah we all set up now we are going to compile Modlishka using following command.

make

If we did everything well then it will look like following screenshot.

Now we can check the options by applying the command

./dist/proxy -h

The screenshot of the command is below

Then we configure a target website for phishing. By default Modlishka use google’s domain as target. Use the command to change target domain.

nano templates/google.com_gsuite.json

The screenshot of the command is below:

Before running Modlishka we need to import our custom SSL certificates in our browser. If we use registered domain then we don’t need to do this cause in that case we use original SSL certificate.

So open firefox web browser and go to

Prefernces > Advanced > Certificates > View Cretificates > Import

The select the MyCA.pem file in the directory root/go/src/github.com/drk1wi/Modlishka

The screenshot is following:

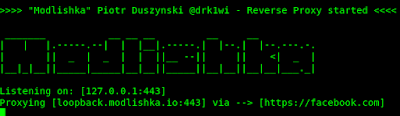
Now we are all set to start Modlishka server. We did not changed the configuration file so we start using following command :

./dist/proxy -config templates/google.com_gsuite.json

Then the tool will be started in our localhost. The screenshot of Modlishka is following :

Modlishka is started now go to firefox browser and we go to the https://www.loopback.modlishka.io and this will open Google.com in live mode.

Now go to log in page and try to log in with fake password or 2 factor authenticate.

This is a grate tool, isn’t it ? Write your thoughts in the comment section. Thanks for read this.

KP AKA Koushik Pal is a Security researcher and specialist focused on educating about Linux for cybersecurity and URLโ€‘masking vulnerabilities. Creator of MaskPhish, a wellโ€‘known openโ€‘source bash-based URLโ€‘masking tool. Linux enthusiasts Active speaker, trainer, and advocate for secure web practices.

66 comments

comments user
Wishing You

Oh my god it really works

comments user
Valar morghulish

Nice post,it helps me alot,keep it up !!

comments user
Unknown

Good job buddy

comments user
Unknown

Super-duper hit tutorial

comments user
Unknown

Wow….really working tutorial

comments user
Unknown

It's grate tool

comments user
Unknown

yah..its a grate tool.. thanks for this info

comments user
Master

Como realizo la configuraciรณn para enviar el link al usuario final?

Cual seria el link a enviar?

comments user
Master

Por favor explicar cual seria el link para enviar para enviar por correo ?

comments user
Kali Linux

Gracias por tu valioso comentario. Si estรก utilizando WAN con un dominio registrado y certificados SSL, puede enviar el enlace a cualquier formulario, como correo o SMS o redes sociales. He discutido algunas buenas tรฉcnicas en el รบltimo de este post. lea todo (lo siento, no sรฉ espaรฑol, escribรญ esto con la ayuda del traductor de Google)

comments user
Kali Linux

Gracias por tu valioso comentario maestro. En este tutorial usรฉ una conexiรณn LAN, lo que significa que solo funciona para aquellos que se conectaron a nuestra red. ยฟCรณmo enviar el enlace? oh simplemente sms

comments user
MKO

How to freessl cert for this ,

comments user
Unknown

When i am run… proxy..then show that permission denite

comments user
Kali Linux

try with sudo tthen command .. Kali updated to non root user. thats why this error comes.. try sudo bfore your command.

comments user
Anonymous

Please help I can't seem to install golang on my Kali Linux 2020.2, I've tried using sudo still no avail. Please help me!!!

comments user
Kali Linux

You can try to install Golang manually. Check our most resent article. Keep visiting. Thanks

comments user
Anonymous

Great tutorial, it helped me!
But I have a question, this was to try on our own LAN but what if we want to send the link to another person? Can we do it using a free domain host?

comments user
Kali Linux

This is not made for hosting as a website. A simple solution is we can use ngrok or portmap services to make it accessible via internet.

comments user
Unknown

I have done all the setting you mentioned but i am getting problem on last step which means after i am putting the command "./dist/proxy -config templates/google.com_gsuite.json". By opening gmail it is showing as "This browser or app may not be secure". Then i used different website other than gmail to login but getting a error of "tls handshake error from 127.0.0.1 eof".

I am using Kali linux 2020.1 with firefox quantum 68.2 version.

comments user
Kali Linux

Let us check these issues and give us some time to try these things. We will get back to you on couple of days. Thanks

comments user
Unknown

Thank you so much and i am waiting for your solution.

comments user
Kali Linux

Hi we have asked your question to Modlishka developers. They answered "check if the tool is listening on all ports and you will have to create your own certificate to get rid of the remaining tls related warnings.". You can check our conversions here

comments user
Unknown

Thank you so much brother! will not forget your help. I will try to correct myself.

comments user
Unknown

Hi, thanks for the effort, I got stuck when opening the autocert.go it didnt show the code so I can paste the key in; the window was an empty text editor with no code, am I doing anything incorrectly?
Thank you!

comments user
kali user

modlishka failed to downlod and its not available in github.

comments user
kali user

modlishka failed to downlod and its not available in github.

comments user
Kali Linux

It's in the same place https://github.com/drk1wi/Modlishka

comments user
Kali Linux

It's in the same place https://github.com/drk1wi/Modlishka

comments user
kiddiee

how??pls explain i also want to know that pls perefer ngrok

comments user
Kali Linux

@kiddiee We don't suggest ngrok. We suggest to use portmap.

comments user
Anonymous

hello really appreciate ur work do u mind telling how to use ngrok token or portmap please.feel free to drop a mail to muhasheikh8@gmail.com

comments user
Kali Linux

We have tutorial for Portmap, you can check it. Or you can learn it easily form Goggle search or Youtube. Thanks.

comments user
Unknown

How can I get leafpad ? I can't create the key without it

comments user
Kali Linux

Leafpad is a text editor of Gnome Environment. After Kali new update it got xfce. mousepad is also good editor. Simply you can replace "leafpad" to "mousepad".

comments user
Unknown

can I pay you to install this for me on laptop still struggling contact me john.lu2477@gmail.com

comments user
Unknown

Im getting stuck at " ls" and "leafpad MyCA.key" am I suppose to open up a new Kali Linux tab ?

comments user
Kali Linux

We don't accept money from our readers. You can ask here (comment section) for any kind of problems we will try to help you. Thanks

comments user
Unknown

something is wrong with this part

" cd root/go/src/github.com/drk1wi/Modlishka/
-bash: cd: root/go/src/github.com/drk1wi/Modlishka/: No such file or directory "

comments user
Kali Linux

This file system was for previous version of Kali, now you need to use newer file system where root user is not default and xfce. You need to choose your own non-root user and those file system and folders.

comments user
aiprogtech

how can i log into my instagram account, i lost my phone which I used for two factor authentication, whenever i try to login, instagram sends me security code to my phone number, which i lost,…. can any hody help me to get my account back

comments user
Kali Linux

Get another SIM card with the same number. Your problem is solved. Using Modlishka we can trick user to bypass two-step verification, but if anyone don't know this we can't use phishing technique.

comments user
Unknown

HI I installed modlishka and everything seems to be working fine apart from one issue i face:
If i try to log in from firefox its telling me couldnt sign you in after just enterring the email address and pressing next.
In chrome after putting the email address and pressing next i get the message cookies disabled.
i aready checked the browser settings cookies are all allowed and i even added the link in the cookie list just to see, but same problem.

Do i need to adjust anything in the json file or where could my problem be ?
Any help would be much appriciated

comments user
Kali Linux

This happens with us also. We have seen in this problem happens with lots of people.
You can check this issue on modlishka repository. But the developers didn't replayed. Did this happens with only Google?

comments user
Unknown

Thats also my problem the developer seems to have disappeared as he hasn't replied to any of the post there.
At this stage I only checked with google cause that was my main reason to look into this program now im currently searching for another one which would give me the same benefits as modlishka.
I think I will check it with other sides aswell to see if it is only google or more, cause that would actually indicate at least in the direction were we need to look at.
I couldn't find any other (active) side whos still dealing with modlishka they all got tutorials, but when it comes to people who need assistance they all seem to have disappeared unfortunately….

comments user
Kali Linux

Yap. We need their assistance. If you found anything please tell us. Thanks.

comments user
Anonymous

I have exactly the same problem. Tried it with mousepad, got an error: 'Unable to init server: could not connect: connection refused' GtK warming: IP adress: cannot open display. How do we fix this?

comments user
Unknown

Its showing ssh not installed

comments user
Kali Linux

It is simple. It means you need to install ssh. Try following commands on terminal:

sudo apt update
sudo apt install openssh-server

That's all. Hope this help you. Thanks.

comments user
Anonymous

Tool still working?

comments user
Kali Linux

Give it a try. We seriously don't know much about now.

comments user
yestitsme

i can't impoer certificate into firefox please help, can you teach how to change target domain

comments user
harry

go this step , i cannot run commands : cd root/go/src/github.com/drk1wi/Modlishka

someone help me
my telegram @harrychung
thanks

comments user
Kali Linux

Please read carefully you will be able to generate firefox certificates. This article is older so the options in firefox may be moved to other places. But you can find them easily.

Thanks.

comments user
harry

someone help me
after I run the command:
./dist/proxy -config templates/google.com_gsuite.json
I got the following error:!!! Error unmarshalling JSON configuration (templates/google.com_gsuite.json): invalid character 'x' looking for beginning of value . Terminating.
someone help me
thank you

comments user
Kali Linux

You just have to copy and paste the cert and key to the autocert.go and "make". no need to add any 'n' chars. no need to add anything to json after this. autocert generates certificates on its own.

comments user
Pat

I got also the error this browser or app not secure
how can solve it?

Should I edit the template json with address and port? and how edit it?
thanks

comments user
Kali Linux

Modlishka admin solved this. But We don't know why they don't make it public. Here you can see what the creator of Modlishka said on GitHub.

comments user
Unknown

I was able to make my private key but when I run "make" it says go.mod file not found. Where can I find this file? Thank you

comments user
Kali Linux

This seems problem in your 'go'. Make sure that you have updated version of go. Then start everything from the very beginning.

comments user
Anonymous

When I run make. Here is what I got. Please help.
make: *** No targets specified and no makefile found. Stop.

comments user
Kali Linux

Please run ls command and make sure that there is file named "makefile". I think you didn't properly cloned the Modlishka repository from GitHub. Thanks.

comments user
Anonymous

Firefox canโ€™t establish a connection to the server at www.loopback.modlishka.io.

Any solution to this??

comments user
Kali Linux

How did you generate the certificate? remember that CA certificate goes to the autocert plugin (used for testing), while the final certificate (that should be also signed by a trusted CA) is set in the json file

comments user
Anonymous

Nice fake replies to your own post lol, even spelled "great" wrong in the same way…

comments user
Anonymous

!!! x509: malformed certificate . Terminating. that is the response i keep getting

comments user
Anonymous

This is somewhat of a bug in pre-1.17 behavior, but poses a question about what we should do in the post-1.17 parser. The pre-1.17 parser ignores the class of the ASN.1 tag for each name, meaning it accepts tags with the correct context-specific tag, but invalid class bits, such as in this case (from your example the full tag is 0x06, so the class bits are 000, and the tag is 0x06). This means we attempt to parse a random OID as a URI, which is obviously wrong, and throws an error.

In the post-1.17 parser we are more strict, validating that the class bits are correct for the tag, ignoring the strange entries in the SubjectAltName. This is, I believe, the correct behavior.

This does pose a question though, we currently accept entries in the SEQUENCE OF which contain both context-specific tags >8, the highest tag specified in RFC 5280, and invalid class bits. It may be prudent, and catch cases like this, to throw an error when we hit these cases, since they are not spec compliant. Since crypto/x509 explicitly targets the web PKI, it seems acceptable to refuse to accept these types of malformed certificates, which while may be acceptable elsewhere, are invalid according to the rules of RFC 5280.

Post Comment